
Django is a powerful and versatile web framework for Python, designed to help developers build robust, scalable, and maintainable web applications rapidly. Whether you’re a beginner or an experienced developer, understanding Django’s core concepts, architecture, and best practices is crucial for creating efficient web applications. This comprehensive guide will delve into the essentials of Django, covering everything from setting up your environment to deploying your application. By the end of this guide, you’ll have a deep understanding of Django and how to leverage it for your next web development project.
What is Django?
Django is a high-level Python web framework that encourages rapid development and clean, pragmatic design. Built by experienced developers, it handles much of the hassle of web development, allowing you to focus on writing your application without needing to reinvent the wheel.
Key Features of Django:
- ORM (Object-Relational Mapping): Simplifies database operations by allowing developers to interact with the database using Python objects instead of SQL queries.
- Admin Interface: Provides a ready-to-use, customizable administrative interface for managing application data.
- Form Handling: Simplifies form generation and validation.
- Authentication System: Includes a comprehensive authentication system, managing user login, registration, and permissions.
- Scalability: Designed to handle high-traffic websites, making it suitable for both small and large applications.
Setting Up Your Django Environment
To get started with Django, you need to set up your development environment. This involves installing Python, Django, and setting up a virtual environment to manage your project dependencies.
Steps to Set Up Your Environment:
- Install Python: Ensure you have Python installed on your machine. You can download it from the official Python website.
- Install Virtualenv: Create isolated Python environments to manage dependencies for different projects.
1 | pip install virtualenv |
- Create a Virtual Environment: Set up a virtual environment for your Django project.
1 2 | virtualenv myenv |
- Install Django: Install the latest version of Django within your virtual environment.
1 | pip install django |
Creating a Django Project
After setting up your environment, the next step is to create a new Django project. A Django project is a collection of settings and configurations for a specific web application.
Steps to Create a Django Project:
- Start a Project: Use the
django-admincommand to create a new project.
1 | django-admin startproject myproject |
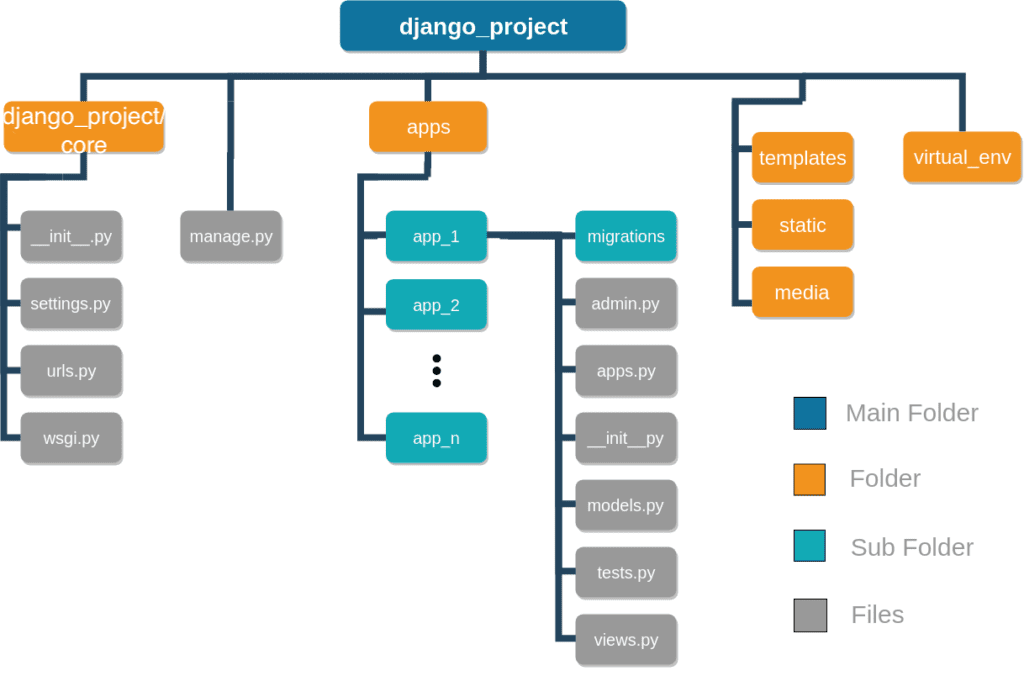
- Project Structure: Your project directory will look like this:
1 2 3 4 5 6 7 8 | myproject/ manage.py myproject/ __init__.py settings.py urls.py asgi.py wsgi.py |
manage.py: A command-line utility for interacting with your project.settings.py: Configuration file for your project.urls.py: URL declarations for your project.asgi.pyandwsgi.py: Interfaces for ASGI and WSGI applications.
Creating a Django App
In Django, an app is a web application that does something – for example, a blog, a database of public records, or a simple poll application. A project can contain multiple apps.
Steps to Create a Django App:
- Start an App: Use the
startappcommand to create a new app.
1 | python manage.py startapp myapp |
- App Structure: The directory structure for the app will look like this:
1 2 3 4 5 6 7 | myapp/ __init__.py admin.py apps.py models.py tests.py views.py |
- Register the App: Add your new app to the
INSTALLED_APPSlist insettings.py.
1 2 3 4 | INSTALLED_APPS = [ # other apps, 'myapp', ] |
Understanding Django’s MVT Architecture
Django follows the Model-View-Template (MVT) architecture, which is a variant of the traditional MVC (Model-View-Controller) pattern.
Components:
- Model: Defines the data structure. Django provides an ORM to interact with the database using Python code.
- View: Contains the business logic and interacts with the model to fetch data and render it using templates.
- Template: Defines the HTML structure and presentation logic.
Example:
1 2 3 4 5 6 7 8 9 10 11 12 13 14 15 16 17 18 19 | # models.py from django.db import models class Task(models.Model): title = models.CharField(max_length=200) completed = models.BooleanField(default=False) # views.py from django.shortcuts import render from .models import Task def index(request): tasks = Task.objects.all() return render(request, 'index.html', {'tasks': tasks}) # index.html {% for task in tasks %} <p>{{ task.title }} - {{ task.completed }}</p> {% endfor %} |
Working with Django ORM
The Django ORM simplifies database interactions by allowing developers to work with databases using Python objects instead of writing SQL queries.
Creating Models:
Define your database schema using Django models.
1 2 3 4 5 6 | from django.db import models class Blog(models.Model): title = models.CharField(max_length=200) content = models.TextField() published_date = models.DateTimeField(auto_now_add=True) |
Querying the Database:
Use the ORM to query the database.
1 2 3 4 5 6 7 | from .models import Blog # Retrieve all blog posts all_blogs = Blog.objects.all() # Retrieve a specific blog post blog = Blog.objects.get(id=1) |
Django Templates
Templates in Django are used to generate HTML dynamically. They allow you to define the structure of your HTML pages and insert dynamic content.
Creating a Template:
1 2 3 4 5 6 7 8 9 10 11 12 13 14 15 | <!-- templates/index.html --> <!DOCTYPE html> <html> <head> <title>My Blog</title> </head> <body> <h1>Blog Posts</h1> {% for blog in blogs %} <h2>{{ blog.title }}</h2> <p>{{ blog.content }}</p> <p>Published on: {{ blog.published_date }}</p> {% endfor %} </body> </html> |
Rendering a Template in a View:
1 2 3 4 5 6 7 | # views.py from django.shortcuts import render from .models import Blog def index(request): blogs = Blog.objects.all() return render(request, 'index.html', {'blogs': blogs}) |
URL Routing
Django’s URL routing system allows you to map URLs to views, making it easy to handle web requests.
Defining URL Patterns:
1 2 3 4 5 6 7 8 | # urls.py from django.urls import path from . import views urlpatterns = [ path('', views.index, name='index'), path('blog/<int:id>/', views.blog_detail, name='blog_detail'), ] |
Connecting URLs to Views:
1 2 3 4 | # views.py def blog_detail(request, id): blog = Blog.objects.get(id=id) return render(request, 'blog_detail.html', {'blog': blog}) |
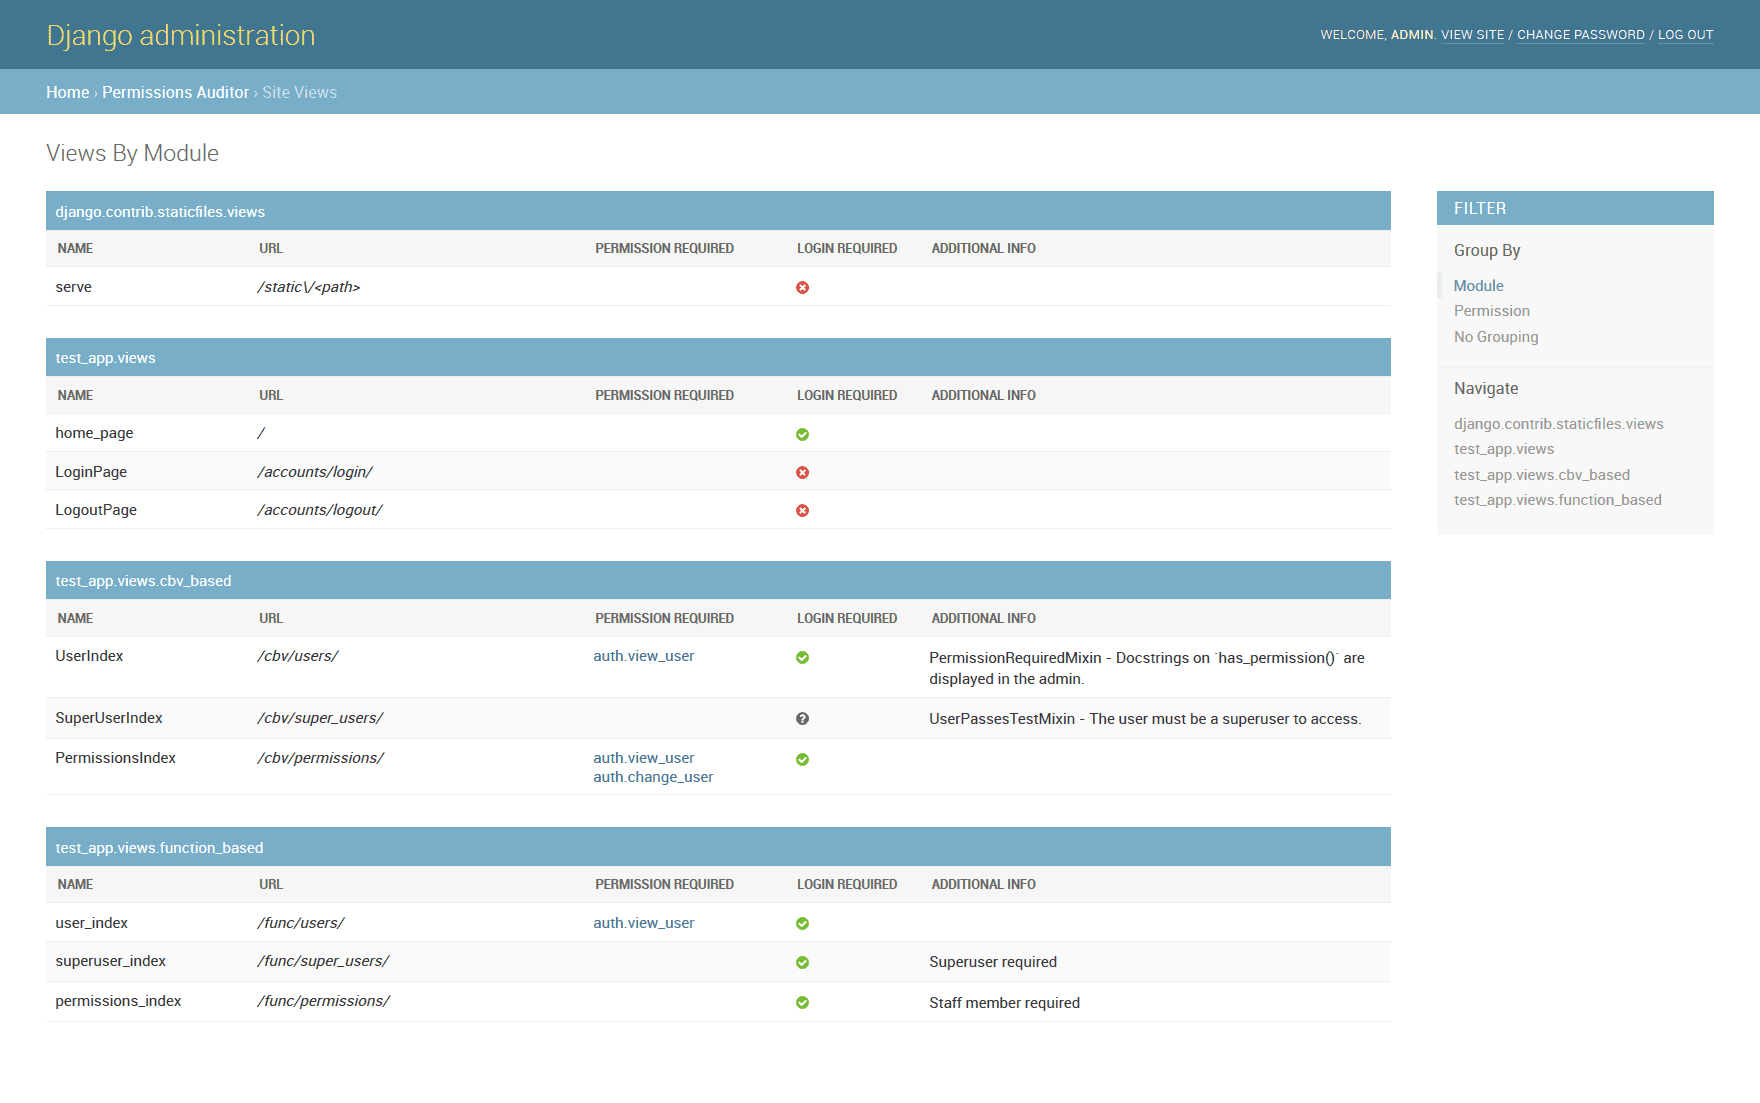
Django Admin Interface
Django’s admin interface is a powerful feature that provides a web-based interface for managing application data.
Enabling the Admin Interface:
- Add to INSTALLED_APPS:
1 2 3 4 | INSTALLED_APPS = [ 'django.contrib.admin', # other apps ] |
- Create a Superuser:
1 | python manage.py createsuperuser |
- Register Models with the Admin:
1 2 3 4 5 6 7 | # admin.py from django.contrib import admin from .models import Blog @admin.register(Blog) class BlogAdmin(admin.ModelAdmin): list_display = ('title', 'published_date') |
Testing in Django
Testing is a crucial part of developing robust applications. Django provides a comprehensive testing framework to help ensure your application works as expected.
Writing Tests:
1 2 3 4 5 6 7 8 9 | # tests.py from django.test import TestCase from .models import Blog class BlogModelTest(TestCase): def test_blog_creation(self): blog = Blog.objects.create(title="Test Blog", content="Test Content") self.assertTrue(isinstance(blog, Blog)) self.assertEqual(blog.__str__(), blog.title) |
Running Tests:
1 | python manage.py test |
Middleware in Django
Middleware is a way to process requests globally before they reach the view or after the view has processed them. They are a lightweight, low-level plugin system for globally altering Django’s input or output.
Creating Middleware:
To create a custom middleware, you need to create a class that contains at least one of the following methods: __init__, process_request, process_view, process_exception, process_template_response, or process_response.
1 2 3 4 5 6 7 8 9 10 | # myapp/middleware.py class SimpleMiddleware: def __init__(self, get_response): self.get_response = get_response def __call__(self, request): # Code to be executed for each request before the view (and later middleware) are called. response = self.get_response(request) # Code to be executed for each request/response after the view is called. return response |
To use the middleware, add it to the MIDDLEWARE setting in your settings.py file:
1 2 3 4 5 6 7 8 9 10 | MIDDLEWARE = [ 'django.middleware.security.SecurityMiddleware', 'django.contrib.sessions.middleware.SessionMiddleware', 'django.middleware.common.CommonMiddleware', 'django.middleware.csrf.CsrfViewMiddleware', 'django.contrib.auth.middleware.AuthenticationMiddleware', 'django.contrib.messages.middleware.MessageMiddleware', 'django.middleware.clickjacking.XFrameOptionsMiddleware', 'myapp.middleware.SimpleMiddleware', ] |
Django Forms
Django’s form handling library simplifies the process of handling user input, validating data, and rendering HTML forms.
Creating Forms:
You can create forms in Django using the forms module.
1 2 3 4 5 6 7 | # forms.py from django import forms class ContactForm(forms.Form): name = forms.CharField(max_length=100) email = forms.EmailField() message = forms.CharField(widget=forms.Textarea) |
Handling Form Submission:
In your views, you can handle form data, validate it, and take appropriate actions.
1 2 3 4 5 6 7 8 9 10 11 12 13 14 | # views.py from django.shortcuts import render, redirect from .forms import ContactForm def contact(request): if request.method == 'POST': form = ContactForm(request.POST) if form.is_valid(): # Process form data return redirect('success') else: form = ContactForm() return render(request, 'contact.html', {'form': form}) |
Rendering Forms in Templates:
Use Django’s built-in form rendering methods to display the form in your templates.
1 2 3 4 5 6 | <!-- templates/contact.html --> <form method="post"> {% csrf_token %} {{ form.as_p }} <button type="submit">Submit</button> </form> |
Deploying Django Applications
Deploying a Django application involves several steps, including setting up a production environment, configuring your web server, and securing your application.
Production Setup:
- Set Debug to False:
1 | DEBUG = False |
- Allowed Hosts:
1 | ALLOWED_HOSTS = ['yourdomain.com'] |
Web Server Configuration:
Django applications are typically deployed using WSGI (Web Server Gateway Interface). Common choices include Gunicorn and uWSGI.
Using Gunicorn:
1 2 | pip install gunicorn gunicorn myproject.wsgi:application |
Nginx Configuration:
Nginx is often used as a reverse proxy server to serve static files and forward requests to the application server.
1 2 3 4 5 6 7 8 9 10 11 12 13 14 15 16 17 18 19 20 | server { listen 80; server_name yourdomain.com; location / { proxy_pass http://127.0.0.1:8000; proxy_set_header Host $host; proxy_set_header X-Real-IP $remote_addr; proxy_set_header X-Forwarded-For $proxy_add_x_forwarded_for; proxy_set_header X-Forwarded-Proto $scheme; } location /static/ { alias /path/to/static/files/; } location /media/ { alias /path/to/media/files/; } } |
Security Considerations:
- Use HTTPS: Secure your site with an SSL certificate.
- Database Security: Ensure your database is not publicly accessible.
- Environment Variables: Use environment variables to store sensitive information.
Advanced Django Features
Class-Based Views (CBVs)
Class-Based Views (CBVs) offer an alternative to function-based views by providing a class-based approach to request handling, which can be more organized and reusable.
Creating a CBV:
1 2 3 4 5 6 7 | # views.py from django.views import View from django.http import HttpResponse class MyView(View): def get(self, request): return HttpResponse('Hello, World!') |
URL Configuration for CBVs:
1 2 3 4 5 6 7 | # urls.py from django.urls import path from .views import MyView urlpatterns = [ path('myview/', MyView.as_view(), name='myview'), ] |
Django REST Framework (DRF)
For building APIs, Django REST Framework is the go-to solution. It provides a robust toolkit for building Web APIs.
Installing DRF:
1 | pip install djangorestframework |
Creating an API:
Define your serializers and views to handle API requests.
Serializers:
1 2 3 4 5 6 7 8 | # serializers.py from rest_framework import serializers from .models import Blog class BlogSerializer(serializers.ModelSerializer): model = Blog fields = '__all__' |
Views:
1 2 3 4 5 6 7 8 | # views.py from .models import Blog from .serializers import BlogSerializer class BlogListCreate(generics.ListCreateAPIView): queryset = Blog.objects.all() serializer_class = BlogSerializer |
URL Configuration:
1 2 3 4 5 6 7 | # urls.py from django.urls import path from .views import BlogListCreate urlpatterns = [ path('api/blogs/', BlogListCreate.as_view(), name='blog-list-create'), ] |
Django Best Practices
Adhering to best practices ensures that your Django projects are maintainable, scalable, and secure.
Code Organization:
- Modular Structure: Keep your code organized by separating concerns into different apps.
- Reusable Components: Create reusable components and utilities to avoid code duplication.
Security Practices:
- CSRF Protection: Ensure CSRF protection is enabled for all forms.
- Input Validation: Validate and sanitize all user inputs.
Performance Optimization:
- Database Indexing: Use indexing to optimize database queries.
- Caching: Implement caching to reduce database load and improve response times.
Conclusion
In conclusion, Django offers a comprehensive and robust framework for Python developers to build scalable and maintainable web applications. With its powerful features such as the ORM, admin interface, form handling, and templating system, Django simplifies many aspects of web development. By following the best practices and leveraging the advanced features and tools discussed in this guide, you can ensure that your Django applications are not only functional but also efficient, secure, and easy to maintain.
As the landscape of web development continues to evolve, staying updated with the latest Django features and improvements is crucial. Engaging with the Django community, participating in forums, and contributing to open-source projects can further enhance your skills and knowledge.
Whether you are building a simple website or a complex web application, Django provides the necessary tools and framework to help you achieve your goals effectively. Embrace the power of Django, follow the principles of clean and pragmatic design, and build web applications that stand the test of time.
By following this comprehensive guide and exploring the resources provided, you can gain a deep understanding of Django and its capabilities. This knowledge will empower you to tackle complex web development projects and drive innovation in your field. Happy coding!
Useful Links
- Django Overview
- Setting Up Django
- Creating a Django Project
- Creating a Django App
- Understanding Django Architecture
- Django ORM
- Django Templates
- Django URL Routing
- Django Admin Interface
- Django Testing
- Class-Based Views
- Django REST Framework
- Django Best Practices
By following this guide and exploring the resources provided, you can gain a comprehensive understanding of Django and its capabilities. This knowledge will empower you to tackle complex web development projects and drive innovation in your field. Happy coding!